
Virtual try on glasses with JavaScript
E-commerce has become an important part of our lives, offering convenience and accessibility. However, one significant challenge in online shopping is the inability to physically try on products, such as eyeglasses. In this article, we will explore how the combination of TensorFlow.js + Face Mesh model + Three.js, that can transform the e-commerce industry by providing a virtual try on function for glasses. This innovative technology not only enhances customer satisfaction but also boosts sales and reduces product returns.
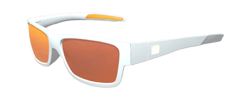
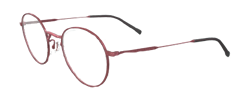
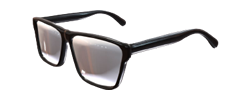
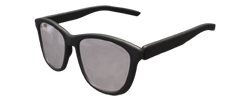
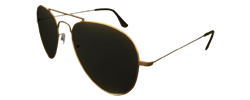
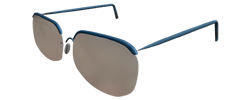
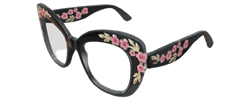
Virtual try on glasses demo
If you are browsing through social media built in browsers, you would need to open the page in Sarafi (iPhone)/ Chrome (Android)
GitHub repository
You can download the complete code of the above demo in the link below:
Implementation
How did you feel about the virtual glasses try-on demo experience? Did you feel the app accurately tracked your facial features and provided an proper representation of how the glasses would look on you? Feel free to leave a comment below, I appreciate your insights and any suggestions you may have for further improvement. Your feedback will help us enhance the virtual try-on technology and create even better experiences in the future.
Follow me below, step by step, we will explore how to leverage TensorFlow.js + Face Mesh model + Three.js to develop a virtual glasses try-on web app. By combining the power of machine learning and 3D rendering, we can provide users with a realistic virtual try-on experience without the need for physical product testing.
# Step 1 : Include JavaScript libraries
First of all, let’s include all the required JavaScript libraries in the <head> section of the html file.
tensorflow.jsface landmarks detection modelthree.js
<html>
  <head>
    <script src="https://unpkg.com/@tensorflow/tfjs-core@2.4.0/dist/tf-core.min.js"></script>
    <script src="https://unpkg.com/@tensorflow/tfjs-converter@2.4.0/dist/tf-converter.min.js"></script>
    <script src="https://unpkg.com/@tensorflow/tfjs-backend-webgl@2.4.0/dist/tf-backend-webgl.min.js"></script>
    <script src="https://unpkg.com/@tensorflow/tfjs-backend-cpu@2.4.0/dist/tf-backend-cpu.min.js"></script>
    <script src="https://unpkg.com/@tensorflow-models/face-landmarks-detection@0.0.1/dist/face-landmarks-detection.min.js"></script>
  </head>
Or you can install it via npm for use in a TypeScript / ES6 project
npm install three
npm install @tensorflow-models/facemesh

//import in js
import * as THREE from '../node_modules/three/build/three.module.js';
import {OrbitControls} from '../node_modules/three/examples/jsm/controls/OrbitControls.js';
import {GLTFLoader} from '../node_modules/three/examples/jsm/loaders/GLTFLoader.js';
const facemesh = require('@tensorflow-models/facemesh');
# Step 2 : Set up 3D glasses model with Three.js
Next step is to set up 3D models of different glasses designs that you want to offer for try-on. Ensure that the models are properly textured and compatible with the Three.js library.
//set up 3D Scene
scene = new THREE.Scene();
renderer = new THREE.WebGLRenderer({
	canvas: canvasElement,
	alpha: true
});
renderer.setSize(videoWidth, videoHeight);
renderer.setClearColor(0x000000, 0);

//set up 3D Camera
camera = new THREE.PerspectiveCamera( 45, 1, 0.1, 2000 );
camera.position.x = videoWidth / 2;
camera.position.y = -videoHeight / 2;
camera.position.z = -( videoHeight / 2 ) / Math.tan( 45 / 2 );
camera.lookAt( { x: videoWidth / 2, y: -videoHeight / 2, z: 0, isVector3: true } );

//set up 3D Glasses object
var gltfLoader = new GLTFLoader();
gltfLoader.setPath(selectedglasses.attr("data-3d-model-path"));
gltfLoader.load( selectedglasses.attr("data-3d-model"), function ( object ) {
	object.scene.position.set(selectedglasses.attr("data-3d-x"),
							  selectedglasses.attr("data-3d-y"),
							  selectedglasses.attr("data-3d-z"));
	scene.add( object.scene );
});
# Step 3 : Webcam video stream element
In order to let users to see themselves in real-time, and interactively try on virtual glasses, we will need to add the html <video> element. With the webcam video stream element in place, users can now witness the live video feed of themselves as they try on virtual glasses.
<video id="webcam" autoplay playsinline width="640" height="480"></video>
To stream your webcam into the browser, I utilize the npm JavaScript module webcam-easy.js, which provides an easy to use module that can access webcam and take photo. To find out more details about that, please refer to my previous blog :

# Step 4 : Load face landmark detection model
To create a successful virtual glasses try-on web app, loading the face mesh model is a crucial step. This model, provided by TensorFlow.js, enables real-time facial landmark detection and tracking, laying the foundation for accurately overlaying virtual glasses onto the user’s face.
The facial landmark detection model accurately identifies key facial landmarks such as the eyes, nose, and mouth. We can load this model by calling the API of faceLandmarksDetection.load().
faceLandmarksDetection.load(faceLandmarksDetection.SupportedPackages.mediapipeFacemesh)
.then(mdl => {
	model = mdl;
	cameraFrame =  detectFaces();
});
# Step 5 : Face tracking and landmark detection
And then, we start to feed the webcam stream through the face mesh model to perform face landmark detection, by calling the API of model.estimateFaces({input}). It takes an input image element (Can be a tensor, DOM element image, video, or canvas) and returns an array of facial landmark key points, bounding boxes and confidence level.
The estimateFaces API comes with a few parameters of the model:
| parameter | default value | description |
| input | The image to classify. Can be a tensor, DOM element image, video, or canvas. | |
| returnTensors | False | Whether to return tensors as opposed to values |
| flipHorizontal | False | Whether to flip/mirror the facial keypoints horizontally. Should be true for user facing webcam stream |
| predictIrises | True | Whether to return keypoints for the irises. Disabling may improve performance. |
async function detectFaces() {
    await model.estimateFaces
    ({
        input: webcamElement,
        returnTensors: false,
        flipHorizontal: false,
        predictIrises: false
    }).then(faces => {
        drawglasses(faces).then(() => {
                cameraFrame = requestAnimFrame(detectFaces);
        });
    });
}
Return of face landmark detection would look like:

For each of the facial landmark key point, it contains the location of the x, y axis and depth.
0: Array(3)
	0: 202.05661010742188
	1: 207.98629760742188
	2: -5.985757827758789
	length: 3
# Step 6 : Render the virtual try On
In the above function, we get 468 face landmark key points. For our virtual glasses try on application, I utilize 4 of those landmarks:
- Middle between Eyes : 168
- Bottom of Nose : 2
- Left Eye : 143
- Right Eye : 372

We can use those key points to calculate where we should overlay the 3d glasses model. We need to calculate 3 things below:
- The (x,y,z) location for the center point of the 3d glasses model
- The scale of the 3d glasses model to fit on the face
- The rotation of the 3d glasses model
glasses.position.x = pointMidEye[ 0 ];
glasses.position.y = -pointMidEye[ 1 ];
glasses.position.z = -camera.position.z + pointMidEye[ 2 ];

glasses.up.x = pointMidEye[ 0 ] - pointNoseBottom[ 0 ];
glasses.up.y = -( pointMidEye[ 1 ] - pointNoseBottom[ 1 ] );
glasses.up.z = pointMidEye[ 2 ] - pointNoseBottom[ 2 ];
const length = Math.sqrt( glasses.up.x ** 2 + glasses.up.y ** 2 + glasses.up.z ** 2 );
glasses.up.x /= length;
glasses.up.y /= length;
glasses.up.z /= length;

const eyeDist = Math.sqrt(
	( pointleftEye[ 0 ] - pointrightEye[ 0 ] ) ** 2 +
	( pointleftEye[ 1 ] - pointrightEye[ 1 ] ) ** 2 +
	( pointleftEye[ 2 ] - pointrightEye[ 2 ] ) ** 2
);
glasses.scale.x = eyeDist ;
glasses.scale.y = eyeDist ;
glasses.scale.z = eyeDist ;

glasses.rotation.y = Math.PI;
glasses.rotation.z = Math.PI / 2 - Math.acos( glasses.up.x );
The last step is to render the 3d glasses model to the face.
renderer.render(scene, camera);
There you go, it’s time for the exciting part – experiencing the demo! Go ahead and enjoy the virtual glasses try-on web app we’ve created, explore different glasses styles to find the perfect fit.

Conclusion
By combining the capabilities of TensorFlow.js, the Face Mesh model, and Three.js, we can create a captivating virtual glasses try-on web app that provides users with an immersive and realistic experience. This technology opens up new possibilities for online shopping, allowing customers to try on glasses virtually before making a purchase. As web technologies continue to evolve, we can expect even more innovative applications that leverage machine learning and 3D rendering to revolutionize user experiences across various domains.
Thank you for reading. If you like this article, please share on Facebook or Twitter. Let me know in the comment if you have any questions. Follow me on Medium, GitHub and Linkedin. Support me on Ko-fi.
2 Comments
Useful article, thank you. Top article, very helpful.
Thnx for share.. Very best post. Ty.