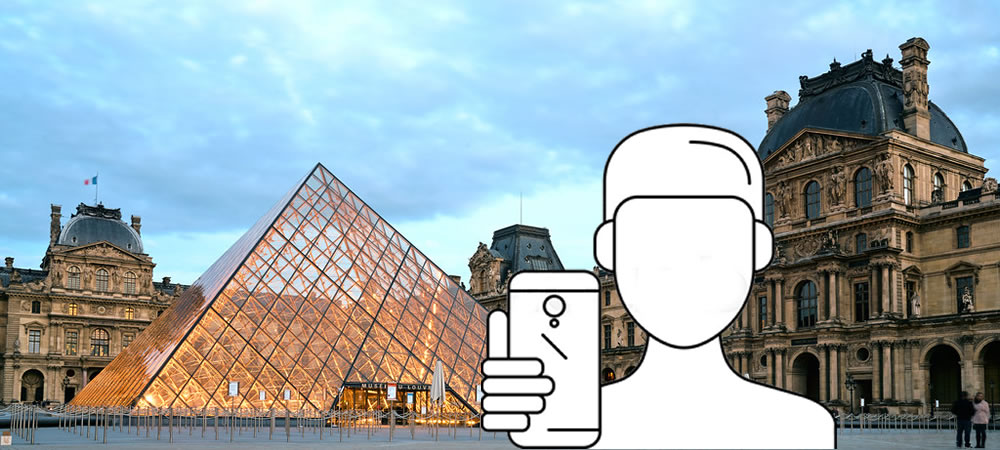
Selfie Anywhere – Person Segmentation with BodyPix
Have you ever had a moment when browsing those pretty travel selfies on social media, you talk to yourself: “I wish I could be there”? Guess what, we are going to make it come true today. With the latest technology of Person Segmentation, we can separate the body section with the background on a pixel level.
Today, we will build a Selfie Anywhere app, which can put you inside those beautiful travel scenes by changing the background of a selfie in real-time. You don’t need Photoshop, and you don’t need a green screen neither. Let’s have some fun and count down ” 3, 2, 1… Say cheese” !
Selfie Anywhere Demo
Turn on your webcam and allow access permission, let’s explore the world through selfies.
1. Please allow permission to access camera.
2. If you are browsing through social media built in browsers, look for the … or browser icon on the right top/bottom corner, and open the page in Sarafi (iPhone)/ Chrome (Android)
GitHub repository
You can download the complete code of the above demo in the link below:
Implementation
Did you take some selfies above and show that to your friends? I hope you like it, this app utilized an advanced technique called Person Segmentation, which can identify human being in an image or video stream, and segment the foreground body from the background.
Early this year, Google releases BodyPix, an open-source machine learning model which allows for person and body-part segmentation in the browser with TensorFlow.js. I was amazed by this technology, and come up with the idea of building the above Selfie Anywhere application. Follow me below for the journey of how I implemented it.
# Step 1 : Include tfjs and body-pix
First of all, simply include the script Tensorflow.js and its body-pix model in the <head> section of the html file.
<html>
  <head>
    <script src="https://cdn.jsdelivr.net/npm/@tensorflow/tfjs@1.2"></script>
    <script src="https://cdn.jsdelivr.net/npm/@tensorflow-models/body-pix@2.0"></script>
  </head>
Or you can install it via npm for use in a TypeScript / ES6 project
npm install @tensorflow-models/body-pix
# Step 2 : Stream webcam to browser
To stream your webcam into the browser, I utilize the JavaScript library navigator.mediaDevices.getUserMedia. To find out more details about that, please refer to my previous blog :

# Step 3 : Load BodyPix Model
In order to process segmentation, we first need to load the pre-trained BodyPix model, by calling the API of bodyPix.load(modelConfig). BodyPix comes with a few different versions of the model, with different performance characteristics trading off model size and prediction time with accuracy.
By default, BodyPix loads a MobileNetV1 architecture with a 0.75 multiplier. It performs better for computers with mid-range/lower-end GPUs. A model with a 0.50 multiplier is recommended for mobile. ResNet architecture would work better for computers with even more powerful GPUs.
bodyPix.load({
	architecture: 'MobileNetV1',
	outputStride: 16,
	multiplier: 0.75,
	quantBytes: 2
})
# Step 4 : Person segmentation
Next, we start to feed the webcam stream through the body-pix model to perform person segmentation, by calling the API of net.estimatePersonSegmentation(image, outputStride, segmentationThreshold). It segments an image into pixels that are and aren’t part of a person. It returns a binary array with 1 for the pixels that are part of the person, and 0 otherwise. The array size corresponds to the number of pixels in the image.
net.segmentPerson(webcamElement,  {
	flipHorizontal: true,
	internalResolution: 'medium',
	segmentationThreshold: 0.5
  })
  .then(personSegmentation => {
	if(personSegmentation!=null){
		drawBody(personSegmentation);
	}
});
cameraFrame = requestAnimFrame(detectBody);
flipHorizontal defaults to false. If the segmentation & pose should be flipped/mirrored horizontally. This should be set to true for videos where the video is by default flipped horizontally (i.e. a webcam), and you want the segmentation & pose to be returned in the proper orientation.
segmentationThreshold is used to determining the minimum value a pixel’s score must have to be considered part of a person. In essence, a higher value will create a tighter crop around a person but may result in some pixels being that are part of a person being excluded from the returned segmentation mask.
Returns
It returns a Promise that resolves with a SemanticPersonSegmentation object. Multiple people in the image get merged into a single binary mask. In addition to width, height, and data fields, it returns a field allPoses which contains poses for all people.
// the data array for the all people containing 307200 values, one for each pixel of the 640x480 image.
{
  width: 640,
  height: 480,
  data: Uint8Array(307200) [0, 0, 0, 0, 0, 0, 0, 0, 0, 0, 0, 0, 0, 1, 0, 0, 1, …],
  allPoses: [{"score": 0.4, "keypoints": […]}, …]
}
# Step 5 : Remove Background
In the above function, we get the binary array to indicate pixels belong to body or not, now we can use it to remove the background, and only draw the body on a canvas. In an ImageData object, each pixel holds the values of red, green, blue, and alpha (transparency), the trick to remove the background is by setting the pixel’s transparency value to 0.
const canvasPerson = document.getElementById("canvasPerson");
let contextPerson = canvasPerson.getContext('2d');

function drawBody(personSegmentation)
{
    contextPerson.drawImage(camera, 0, 0, camera.width, camera.height);
    var imageData = contextPerson.getImageData(0,0, camera.width, camera.height);
    var pixel = imageData.data;
    for (var p = 0; p<pixel.length; p+=4)
    {
      if (personSegmentation.data[p/4] == 0) {
          pixel[p+3] = 0;
      }
    }
    contextPerson.imageSmoothingEnabled = true;
    contextPerson.putImageData(imageData,0,0);
}
# Step 6 : Overlay canvas above background image
Once we had the canvas that only contains the body with a transparent background, then we just need to overlay it on top of a background image of the breathtaking nature scene.
<video id="webcam" autoplay playsinline width="640" height="480"></video>
<div id="selfie-container">
	<div id="background-container"></div>
	<canvas id="canvasPerson" width="640" height="480"></canvas>
</div>
Applying css style below
#selfie-container {
	height: 100vh;
	width: 100vw;
	transform-style: preserve-3d;
	-webkit-transform-style: preserve-3d;
	-moz-transform-style: preserve-3d;
	transform: rotateY(180deg);
	-webkit-transform: rotateY(180deg);
	-moz-transform: rotateY(180deg);
	z-index: 100;
}

#background-container {
	height: 100vh;
	width: 100vw;
	background-image: url(/wp-content/uploads/2019/10/greatwall.jpg);
	background-position: center center;
	background-repeat: no-repeat;
	background-size: cover;
	background-color: transparent;
}

  #canvasPerson{
    background-color: transparent;
    position: absolute;
    width: 100vw;
    height: auto;
    z-index: 9999;
    margin: auto;
    top: 0;
    bottom: 0;
    left: 0;
    right: 0;
    margin-left: auto;
    margin-right: auto;
    -moz-transform: scale(-1, 1);
    -webkit-transform: scale(-1, 1);
    -o-transform: scale(-1, 1);
    transform: scale(-1, 1);
    filter: FlipH;
  }

  #webcam{
    display: block;
    position: relative;
    width: auto;
    height: 100vh;
    z-index: -100;
    pointer-events: none;
    margin-left: -9999px;
  }
# Step 7 : Take screenshot
For taking the picture, I am using a 3rd party javascript library html2canvas.js. It allows you to take “screenshots” of webpages or parts of it, directly on the users browser.
$("#take-photo").click(function () {
    beforeTakePhoto();
    var captureElement= document.getElementById('selfie-container');
    var appendElement= document.getElementById('webcam-container');
    html2canvas(captureElement).then(function(canvas) {
        canvas.id='captureCanvas';
        appendElement.appendChild(canvas);
        document.querySelector('#download-photo').href = canvas.toDataURL('image/png');
        afterTakePhoto();
    });
});
That’s pretty much for the code! Other than that are just making the demo look nice. Choose one of those spectacular scene, set your favorite pose and smile!

End Notes
Advancements in instance segmentation technologies are now showing promise for many fields ranging from self-driving vehicles to medical diagnosis. With deep learning neural network, the models are now became more and more accurate. I hope this article is just the beginning of your journey to learn more about image segmentation and computer vision.
Thank you for reading. If you like this article, please share on Facebook or Twitter. Let me know in the comment if you have any questions. Follow me on Medium, GitHub and Linkedin. Support me on Ko-fi.