Motion Detection JavaScript – Play Drums with Webcam
Have you ever played Xbox games with a motion sensor? Surely it feels so cool to just swing your arms and hit the tennis ball in the video game. Motion detection is the technique that makes this magic happen. It can detect changes in the position of an object relative to its surroundings.
Today, let’s have some fun. We are going to build a Virtual Drums Playground that will allow you to play the drums just by waving your hands in the air. And the best part is, you don’t need any motion sensor. All you need is to turn on the webcam on your PC or mobile.
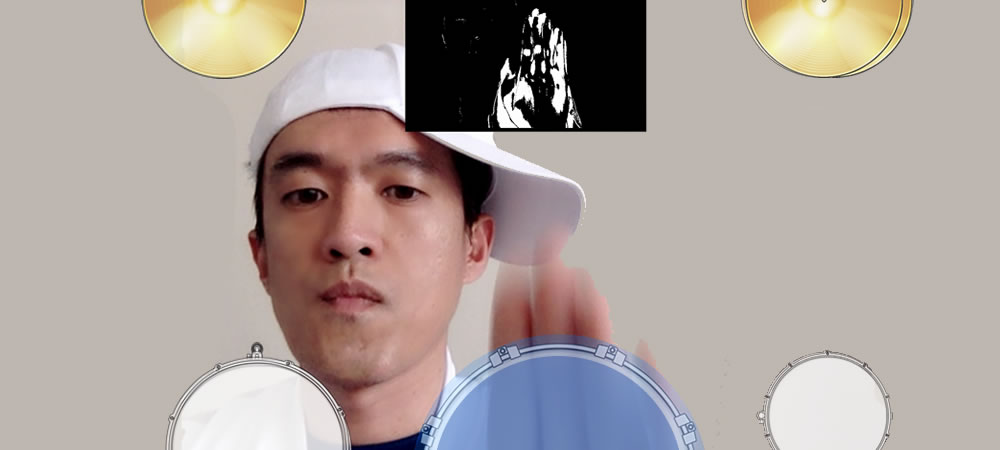
Motion Detection JavaScript demo
Detect motions from your webcam and play the virtual drums by waving your hands in the air.
1. Please allow permission to access camera.
2. If you are browsing through social media built in browsers, look for the … or browser icon on the right top/bottom corner, and open the page in Sarafi (iPhone)/ Chrome (Android)
GitHub repository
You can download the complete code of the above demo in the link below:
Implementation
Did you have fun and kept playing the drums like a rock star? Are you curious about how this magic happened? I was first inspired by the xylophone version of this, and then built my drum version above. Follow me below for the journey of implementing this Virtual Drum Playground.
# Step 1 : Stream webcam to browser
To stream your webcam into the browser, I utilize the JavaScript library navigator.mediaDevices.getUserMedia. For more details, please refer to my previous blog :

# Step 2 : Mark each drum area
Overlay the webcam with images of drums and cymbals. This is done to set the target areas in the webcam so that whenever significant movement is detected in those areas, it triggers the effect of playing the corresponding drum.
HTML
<div class="drum-container">
	<div class="row row-top">
		<div class="col-6 col-sm-3">
			<img class="virtual-drum" src="images/cymbal.png" name="crash" vd-id='0'>
		</div>
		<div class="col-6 col-sm-3 offset-sm-6 d-none d-sm-inline">
			<img class="virtual-drum" src="images/hi-hat.png" name="hi-hat" vd-id='1'>
		</div>
	</div>
	<div class="row row-bottom">
		<div class="col-4 p-sm-3 p-0 d-none d-sm-inline">
			<img class="virtual-drum" src="images/Floor-Tom.png" name="floor-tom" vd-id='2'>
			<div class="spinner-grow text-primary d-none" role="status" id="floor-tom-glowing">
				<span class="sr-only">Loading...</span>
			</div>
		</div>
		<div class="col-5 p-sm-3 p-0">
			<img class="virtual-drum" src="images/Bass-Drum.png" name="kick" vd-id='3'>
			<div class="spinner-grow text-primary d-none" role="status" id="kick-glowing">
				<span class="sr-only">Loading...</span>
			</div>
		</div>
		<div class="col-3 p-sm-3 p-0 d-none d-sm-inline">
			<img class="virtual-drum" src="images/Snare.png" name="snare" vd-id='4'>
			<div class="spinner-grow text-primary d-none" role="status" id="snare-glowing">
				<span class="sr-only">Loading...</span>
			</div>
		</div>
	</div>
</div>
Javascript
Next, store the location of the gears by their (x, y, width, height), please note that the width and height need to be calculated by the ratio between the full screen camera size and the blended canvas size.
$('.virtual-drum').on('load', function () {
    var viewWidth = Math.max(document.documentElement.clientWidth, window.innerWidth || 0);
    var viewHeight = Math.max(document.documentElement.clientHeight, window.innerHeight || 0);
    var ratioWidth = canvasBlended.width/viewWidth;
    var ratioHeight = canvasBlended.height/viewHeight;
    drums[this.attributes['vd-id'].value] = {
        id: this.attributes['vd-id'].value,
        name: this.attributes['name'].value,
        width: this.width * ratioWidth,
        height: this.height * ratioHeight,
        x: this.x * ratioWidth,
        y: this.y * ratioHeight
    }
}).each(function() {
     if (this.complete) $(this).trigger('load');
});
# Step 3 : Load the sound audios
Load the audio soundtracks for drums and cymbals to play the sound effect.
var AudioContext = (
  window.AudioContext ||
  window.webkitAudioContext ||
  null
);

function loadSounds() {
  soundContext = new AudioContext();
  bufferLoader = new BufferLoader(soundContext,
    [
      audioPath+'/Crash.mp3',
      audioPath+'/Hi-Hat.mp3',
      audioPath+'/Floor-Tom.mp3',
      audioPath+'/Kick.mp3',
      audioPath+'/Snare.mp3',
    ],
    finishedLoading
  );
  bufferLoader.load();
}

function finishedLoading(bufferList) {
  for (var i=0; i<5; i++) {
    var source = soundContext.createBufferSource();
    source.buffer = bufferList[i];
    source.connect(soundContext.destination);
    drums[i].sound = source;
    drums[i].ready = true;
  }
}
# Step 4 : Motion Detection by blend mode difference
Next step involves the most important part: motion detection using the Blend Mode Difference technique. This technique calculates the differences between frames to detect movement.
First, let me explain the concept of Blend Mode Difference. Imagine you take one picture, then another one after half second, if there is nothing moved in that half second, those two pictures would be exactly the same. When you subtract the pixel values of those 2 pictures, it would be all 0, the blended images would be completely black. If there is movement in certain areas, the blended image would high light the differences.
If you are interested to find out more details, please refer to this article:
function blend() {
    var width = canvasSource.width;
    var height = canvasSource.height;
    // get webcam image data
    var sourceData = contextSource.getImageData(0, 0, width, height);
    // create an image if the previous image doesn’t exist
    if (!lastImageData) lastImageData = contextSource.getImageData(0, 0, width, height);
    // create a ImageData instance to receive the blended result
    var blendedData = contextSource.createImageData(width, height);
    // blend the 2 images
    differenceAccuracy(blendedData.data, sourceData.data, lastImageData.data);
    // draw the result in a canvas
    contextBlended.putImageData(blendedData, 0, 0);
    // store the current webcam image
    lastImageData = sourceData;
}

function differenceAccuracy(target, data1, data2) {
    if (data1.length != data2.length) return null;
    var i = 0;
    while (i < (data1.length * 0.25)) {
        var average1 = (data1[4*i] + data1[4*i+1] + data1[4*i+2]) / 3;
        var average2 = (data2[4*i] + data2[4*i+1] + data2[4*i+2]) / 3;
        var diff = threshold(fastAbs(average1 - average2));
        target[4*i] = diff;
        target[4*i+1] = diff;
        target[4*i+2] = diff;
        target[4*i+3] = 0xFF;
        ++i;
    }
}
# Step 5 : Play effects and sound
In this step, it continuously check for motion in the drum and cymbal areas, and play the corresponding effects and sounds when significant movement is detected.
window.requestAnimFrame = (function(){
    return  window.requestAnimationFrame       ||
        window.webkitRequestAnimationFrame ||
        window.mozRequestAnimationFrame    ||
        window.oRequestAnimationFrame      ||
        window.msRequestAnimationFrame     ||
        function( callback ){
            window.setTimeout(callback, 1000 / 60);
        };
})();

function update() {
    drawVideo();
    blend();
    checkAreas();
    requestAnimFrame(update);
}
Within the drums and cymbals’ areas, if it detects a significant difference between frames, it indicate that there is movement in that area, after that, we play the effect and sound of the corresponding gear.
function checkAreas() {
    // loop over the drum areas
    for (var drumName in drums) {
        var drum = drums[drumName];
        if(drum.x>0 || drum.y>0){
          var blendedData = contextBlended.getImageData(drum.x, drum.y, drum.width, drum.height);
          var i = 0;
          var average = 0;
          // loop over the pixels
          while (i < (blendedData.data.length * 0.25)) {
              // make an average between the color channel
              average += (blendedData.data[i*4] + blendedData.data[i*4+1] + blendedData.data[i*4+2]) / 3;
              ++i;
          }
          // calculate an average between of the color values of the drum area
          average = Math.round(average / (blendedData.data.length * 0.25));
          if (average > 20) {
              // over a small limit, consider that a movement is detected
              // play a note and show a visual feedback to the user
              //console.log(drum.name + '-' + average)
              playHover(drum);
          }
        }
    }
}

function playHover(drum) {
  if (!drum.ready) return;
  var source = soundContext.createBufferSource();
  source.buffer = drum.sound.buffer;
  source.connect(soundContext.destination);
  source.start(0);
  drum.ready = false;
  playAnimate(drum);
  // throttle the note
  setTimeout(setDrumReady, 500, drum);
}


function playAnimate(drum){
  if(drum.name=="crash" || drum.name=="hi-hat"){
    $('[name="'+drum.name+'"]').effect( "shake",{times:1,distance:5},'fast');
  }
  else{
    var glowing = $("#"+drum.name+"-glowing");
    glowing.removeClass("d-none");
    glowing.height(glowing[0].clientWidth);
    setTimeout(function(){ glowing.addClass("d-none"); }, 500);
  }
}
That’s pretty much for the code. Let’s enjoy and play some crazy drums!

Conclusion
Nowadays, motion detection is an exciting technology that has been applied in various areas, such as security alarms and automatic gates. It can be implemented using different approaches, including sensor-based or computer vision-based object detection. I hope you find this Virtual Drum Playground fun and that it sparks your interest in the latest technology.
Thank you for reading. If you like this article, please share on Facebook or Twitter. Let me know in the comment if you have any questions. Follow me on Medium, GitHub and Linkedin. Support me on Ko-fi.